📔
Defense
  • Defense
  • Getting Started
    • Introductory Networking
      • Introduction
      • The OSI Model: An Overview
        • Answers
      • Encapsulation
        • Answers
      • The TCP/IP Model
        • Answers
      • Wireshark
        • Answers
      • Networking Tools - Ping
        • Answers
      • Networking Tools - Traceroute
        • Answers
      • Networking Tools - WHOIS
        • Answers
      • Networking Tools Dig
        • Answers
      • Further Reading
    • Network Services
      • Understanding SMB
        • Answers
      • Enumerating SMB
        • Answers
        • Untitled
      • Exploiting SMB
        • Answers
        • Untitled
      • Understanding Telnet
        • Answers
      • Enumerating Telnet
        • Answers
        • Untitled
      • Exploiting Telnet
        • Answers
        • Untitled
      • Understanding FTP
        • Answers
      • Enumerating FTP
        • Answers
        • Untitled
      • Exploiting FTP
        • Answers
        • Untitled
      • Expanding Your Knowledge
    • Network Services 2
      • Understanding NFS
        • Answers
      • Enumerating NFS
        • Answers
        • Untitled
      • Exploiting NFS
        • Answers
        • Untitled
      • Understanding SMTP
        • Answers
      • Enumerating SMTP
        • Answers
        • Untitled
      • Exploiting SMTP
        • Answers
        • Untitled
      • Understanding MYSQL
        • Answers
      • Enumerating MYSQL
        • Answers
        • Untitled
      • Exploiting MYSQL
        • Answers
        • Untitled
      • Further Learning
    • Wireshark 101
      • Introduction
      • Installation
      • Wireshark Overview
      • Collection Methods
      • Filtering Packets
      • Packet Dissection
      • ARP Traffic
        • Answers
      • ICMP Overview
        • Answers
      • TCP Traffic
      • DNS Traffic
        • Answers
      • HTTP Traffic
        • Answers
      • HTTPS Traffic
        • Answers
      • Analyzing Exploit PCAPS
      • Conclusion
    • !Intro to Windows
    • Active Directory Basics
      • Introduction
      • Physical Active Directory
        • Answers
      • The Forest
        • Answers
      • Users + Groups
        • Answers
      • Trusts + Policies
        • Answers
      • Active Directory Domain Services + Authentication
        • Answers
      • AD in the Cloud
        • Answers
      • Hands-On Lab
        • Answers
        • Untitled
      • Conclusion
    • !Windows Core Processes
    • !SysInternals
  • Threat and Vulnerability Management
    • !Nessus
      • Introduction
      • Installation
      • !Navigation and Scans
        • Answers
      • !Scanning
      • !Scanning a Web Application
    • MITRE
      • Introduction to Mitre
      • Basic Terminology
      • ATT&CK Framework
        • Answers
      • CAR Knowledge Base
        • Answers
      • Shield Active Defense
        • Answers
      • ATT&CK EmulationPlans
        • Answers
      • ATT&CK® and Threat Intelligence
        • Answers
      • Conclusion
    • Yara
      • Introduction
      • What is Yara?
        • Answers
      • Installing Yara (Ubuntu/Debian & Windows)
      • Deploy
      • Introduction to Yara Rules
      • Expanding on Yara Rules
      • Yara Modules
      • Other Tools and Yara
      • Using LOKI and its Yara rule set
        • Answers
        • Untitled
      • Creating Yara rules with yarGen
        • Answers
        • Untitled
      • Valhalla
        • Answers
      • Conclusion
    • Intro to ISAC
      • Introduction
      • Basic Terminology
      • What is Threat Intelligence?
      • What are ISACs?
      • Using Threat Connect to create a Threat Intel dashboard
      • Introduction to AlienVault OTX
      • Using OTX to gather Threat Intelligence
      • Creating IOCs
      • Investigating IOCs
        • Answers
    • Zero Logon
      • The Zero Day Angle
      • Impacket Installation
      • The Proof of Concept
        • Answers
      • Lab it up!
        • Answers
        • Untitled
    • !OpenVAS
    • !MISP
  • Security Operations and Monitoring
    • Splunk
    • Windows Event Logs
    • Sysmon
    • Suricata
    • Osquery
    • Graylog
    • OpenEDR
  • Threat Emulation
    • Attacktive Directory
    • Attacking Kerberos
    • Atomic Red Team
  • Incident Response and Forensics
    • Volatility
    • Forensics
    • Investigating Windows
    • Windows Forensics
    • Redline
    • Autopsy
  • Malware Analysis and Reverse Engineering
    • History of Malware
    • Malware Introductory
    • Researching
    • Strings
    • Basic Malware RE
    • REMnux: The Redux
    • Reversing .NET Apps
Powered by GitBook
On this page

Was this helpful?

  1. Getting Started
  2. Wireshark 101

Wireshark Overview

PreviousInstallationNextCollection Methods

Last updated 4 years ago

Was this helpful?

The first screen that we are greeted by when opening Wireshark is the main page that will allow us to specify our interface(s) as well as apply filters to narrow down traffic that we are capturing.

Here you can see that I have multiple interfaces to filter from you may have more or fewer interfaces than I have. From here we can choose whether we want to perform a live capture on our interface(s) or load a PCAP for analysis.

It is useful to note that the graphs next to the interface names show the activity on the interface, if an interface has a flat bar it may be useless to attempt to capture on it (as no data on that interface is being picked up by the Wireshark client).

Live Packet Captures

If we begin by navigating to the green ribbon in Wireshark and select Manage Capture Filters we can view a list of available filters.

Once you have any capture filters you want selected, you can begin a capture on an interface by double-clicking the interface or by right-clicking and navigating to Start Capture.

Depending on the network activity you may see no packets coming in or you may see packets streaming in very quickly.

Once you're done gathering the packets you need or want, you can click the red square to stop capturing, and then you can begin your analysis.
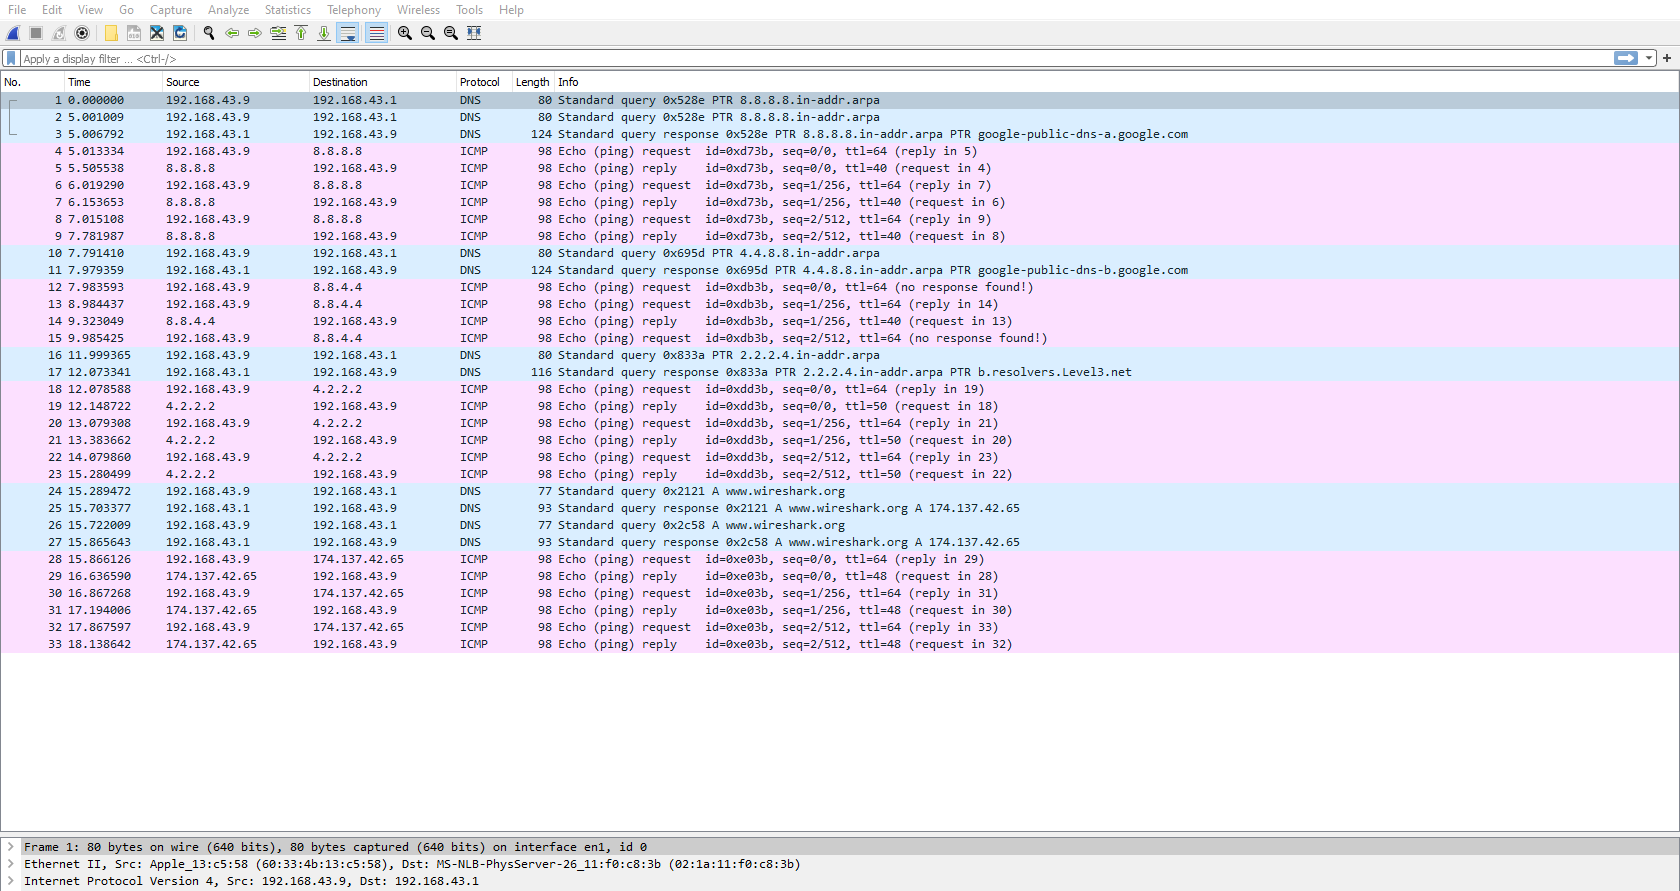
Looking at the screenshot above we see a sample capture. This screen is where you will do most of your analysis and dissection of packets. To open a packet capture go to File > Open > and select what PCAP you want to analyze.

From this screen, Wireshark gives us some important info about each packet including:

  • Packet Number

  • Time

  • Source

  • Destination

  • Protocol

  • Length

  • Packet Info

Along with quick packet information, Wireshark also color codes packets in order of danger level as well as protocol to be able to quickly spot anomalies and protocols in captures.

This quick glance at packet information can be useful to track down exactly what you're looking for during analysis.

Play around with the menus and various features of Wireshark to get a feel for it, some of the features we will be going into further detail within later tasks.

Read the above and play around with Wireshark.

You do not have to select a filter, it will only help to bring down the number of packets being brought in and organize the capture. This is only a brief introduction to filters for more information about filters go to Task 12 or go to the .

Wireshark Website